How to Use Highlights and Notes on Your Kindle: The Complete Guide
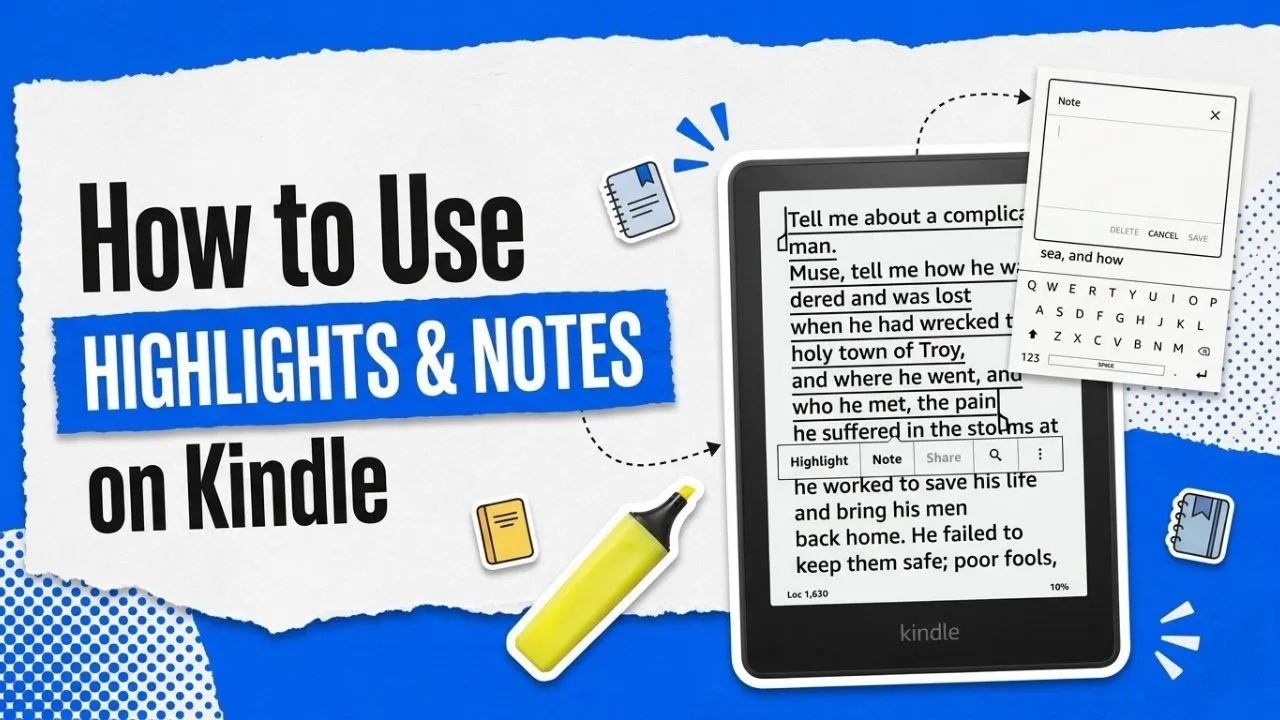
If you’re a reader, you’ve probably dog-eared pages, underlined passages, and scribbled in margins your entire life. The problem with physical books? Highlighter ink bleeds, pencil smudges, and your brilliant margin notes become illegible six months later. Your Kindle, though, handles all of this with an organization level that might genuinely change how you read. Here’s everything you need to know.
How to Highlight Text
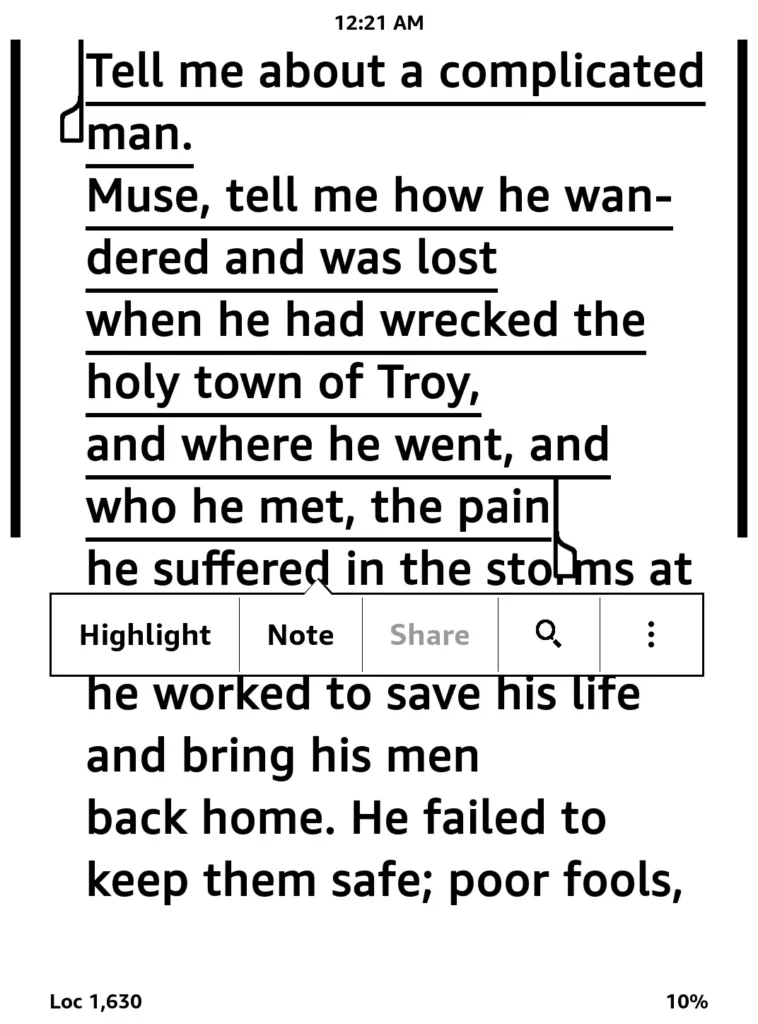
See a line that stops you cold? A paragraph you know you’ll want to revisit? Highlighting it takes about two seconds.
Long-press your finger on the first word of the passage you want to save; hold it for about two seconds. Without lifting your finger, drag it to the end of the selection. A pop-up menu will appear. Tap “Highlight”, and you’re done. On the Kindle’s e-ink display, the text gets a subtle gray underline or shading. That passage is now saved to your account permanently.
How to Add Notes
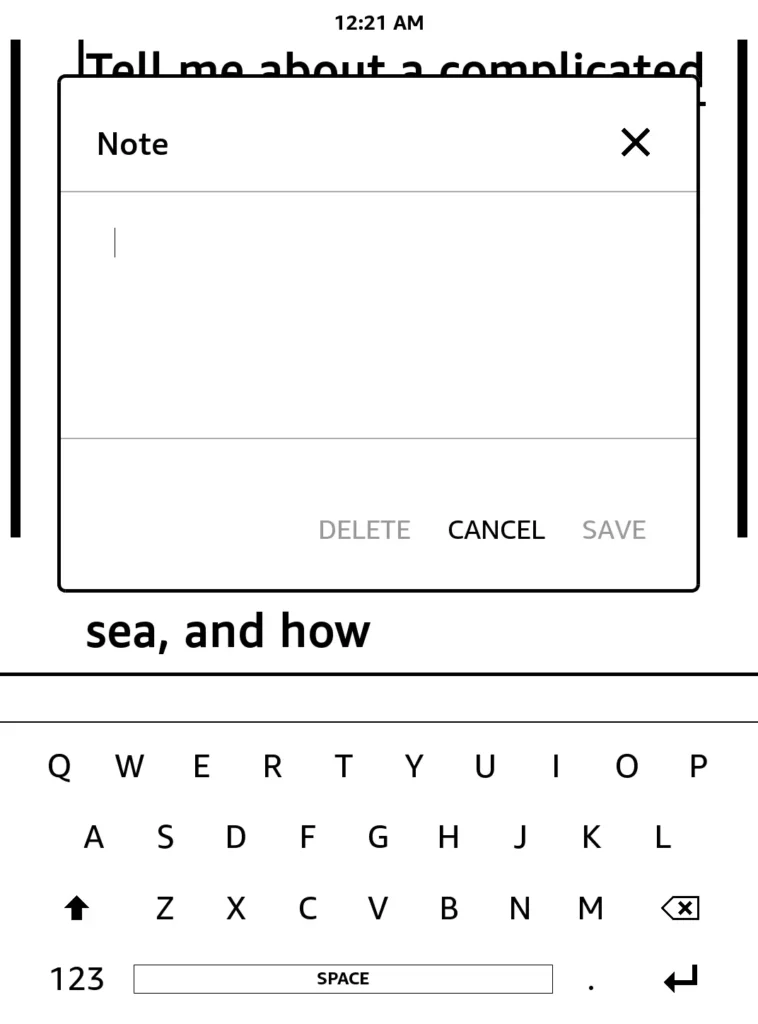
Sometimes a line sparks an idea, a connection to something else you’ve read, a counterargument, a reminder to look something up later. You don’t have to let that thought evaporate.
Select the text the same way you would for a highlight, but this time tap Note in the pop-up menu. The Kindle’s on-screen keyboard will slide up, and you can type whatever you want. Hit save, and a small numbered icon will appear next to the passage. Tap it anytime to pull up what you wrote.
Popular Highlights: The Collective Margin
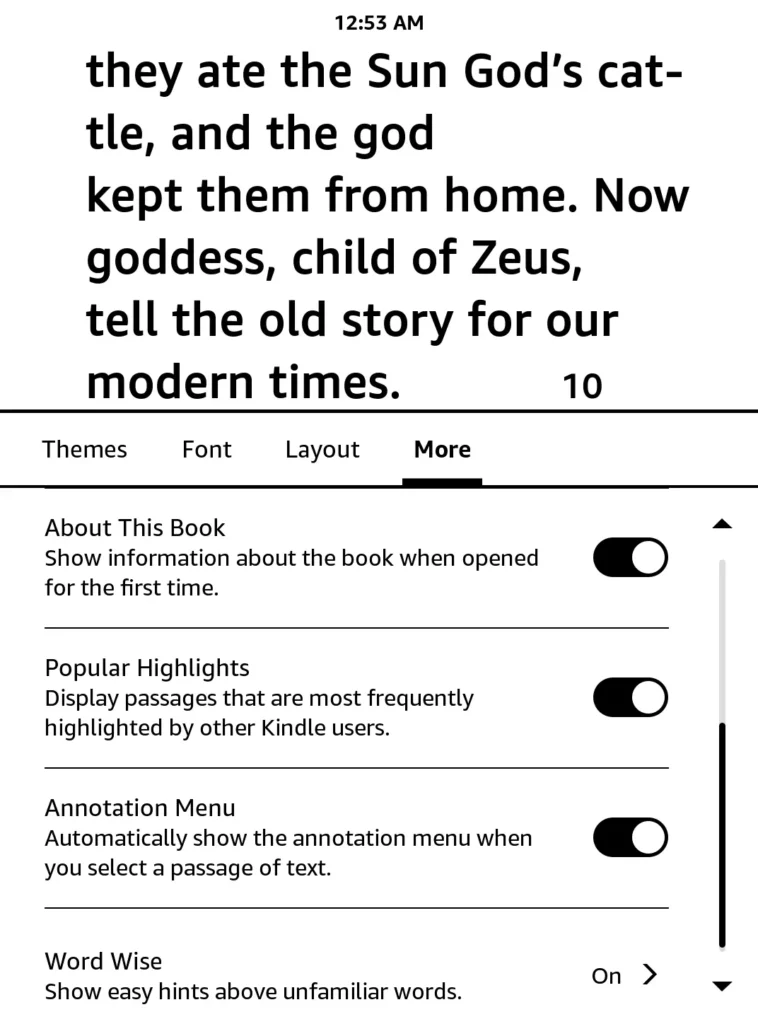
This is one of Kindle’s most underrated features. You’ll occasionally notice faint dotted underlines beneath certain passages lines you didn’t highlight yourself. That’s because thousands of other readers already did. It’s like peering into a massive, crowdsourced annotation layer stretched across every book in the Kindle ecosystem.
To toggle it on or off: While reading, tap the top of the screen, then navigate to Settings (Aa) > More > Popular Highlights. Turn it on, and you’ll instantly see which quotes and passages resonated with the widest audience. Turn it off if you’d rather form your own opinions without the crowd’s influence.
How to Export Your Highlights
All those carefully curated highlights aren’t doing you much good if they’re trapped inside your Kindle. You’ve got two straightforward ways to get them out.
Option 1: My Clippings.txt (Offline)
Plug your Kindle into your computer with a USB cable. Open the “documents” folder, and you’ll find a file called My Clippings.txt. Open it up, and there they are: every highlight and note you’ve ever made, neatly organized with timestamps. It’s a plain-text goldmine.
Option 2: Email Export (Online)
While reading on a Kindle e-reader, tap the top of the screen and hit the three-dot menu or the Notes icon. Select Export Notes. Kindle will email you both a PDF and a CSV file of your highlights for that book. No cable required. This works natively for books purchased from the Kindle Store.
The Pro Move: Third-Party Sync
If you want to skip the manual copy-paste routine, tools like Readwise and Clippings.io do the heavy lifting, but which method they use depends on your book. Install their browser extension, log it into your Amazon account, and for Amazon-purchased ebooks it quietly pulls highlights straight from your Kindle’s cloud-synced notebook, automatically routing everything into apps like Notion, Obsidian, or Evernote. Highlight a passage on your Kindle, and within a few hours it shows up in your digital notebook, no cables, no clippings file to dig through, no copy-pasting.
Personal documents and side-loaded books are a different story. Since those never touch Amazon’s cloud, the extension can’t see them, so you’re back to the manual route: plug the Kindle into your computer via USB, find the My Clippings.txt file, and upload it to Readwise or Clippings.io yourself. It’s the kind of seamless workflow that makes you wonder why you ever bothered with a highlighter pen in the first place.
How to View Your Highlights and Notes on Kindle
You’ve been highlighting passages for three chapters straight. Now you want to flip back through everything you’ve saved without manually hunting for those little gray underlines scattered across 200 pages. That’s exactly what the Notebook is for.
While you’re reading, tap near the top of your screen to pull up the toolbar. You’ll see a Notebook icon; it looks like a small notepad. Tap it, and your Kindle will display every single highlight, note, and bookmark you’ve made in that book, all in one scrollable list.
What makes it genuinely useful is the filtering. At the top of the Notebook panel, you can sort by Highlights, Notes, or Bookmarks individually. So if you only want to revisit the passages you highlighted without wading through your bookmarks and margin notes, you can do that in one tap. Need just your notes? Same thing. It saves you more time than you’d expect. This feature is only available on newer Kindle devices
If you’re running newer Kindle firmware, you’ll notice the annotation panel has been redesigned. Amazon rolled out an updated interface that makes navigating your notes feel smoother, with larger tap targets, a cleaner layout, and quicker access to editing or deleting individual annotations. If you haven’t updated your Kindle in a while, connect to Wi-Fi and let it pull the latest software.
How to View All Kindle Highlights Online
Here’s something a lot of Kindle owners don’t realize: Amazon keeps a copy of every highlight and note you’ve ever made, and you can access all of it from any web browser.
Go to Amazon Notebook. Log in with the same Amazon account linked to your Kindle, and you’ll see your entire library listed with every annotation you’ve made, organized by book and timestamped. No Kindle device required. No app to install. Just a browser and your login.
This is especially handy when you’re sitting at your desk and want to pull a quote from a book you read last month without picking up your Kindle. You can copy and paste highlights directly from the page into a document, an email, or wherever you need them.
Again, this only works for books you purchased through Amazon or synced via your Kindle’s cloud library. If you sideloaded a book onto your Kindle using a USB cable, say, an EPUB you converted or a PDF you transferred manually, those highlights won’t appear here. They exist only in your device’s My Clippings.txt file. It’s one of the trade-offs of going the USB route, and it catches a lot of people off guard.
How to See Kindle Highlights on Your Phone or Tablet
You don’t need a physical Kindle to access your highlights. If you’ve installed the Kindle app on your iPhone, iPad, or Android device, your annotations sync through Amazon’s cloud, as long as you’re signed into the same Amazon account and Sync is enabled on your devices.
Open the Kindle app on your phone or tablet, then open the book whose annotations you want to review. Tap the center of the screen to bring up the reading toolbar, then look for the Notebook icon (same notepad symbol as on the e-reader). Tap it, and you’ll get the same organized list of highlights, notes, and bookmarks, filterable, scrollable, and fully editable right from your phone.
What’s nice about this is the portability, when it works smoothly. You highlight a passage on your Kindle Paperwhite before bed, and often by morning it’s already waiting in the Kindle app on your phone, since syncing usually happens automatically in the background over Wi-Fi. That said, it’s not flawless. Sync occasionally stalls, so don’t be surprised if you sometimes need to nudge it manually.
If your highlights aren’t showing up on your phone, open the book, tap the three-dot menu, and look for a “Sync” or “Sync to Furthest Page Read” option (naming varies slightly by app version), then trigger it manually. If it still doesn’t appear, make sure you’re logged into the correct Amazon account on both devices, and that Sync is toggled on under Settings. It sounds obvious, but it’s the most common culprit.
Kindle Highlights on Goodreads
If you use Goodreads and there’s a decent chance you do if you’re the kind of reader who highlights passages, you can view your Kindle annotations directly on the platform.
Log in to Goodreads with the Amazon account linked to your Kindle. Go to My Books, then look for Kindle Notes & Highlights in the sidebar. Click it, and Goodreads will pull up a list of every book you’ve annotated, along with the specific passages you highlighted and any notes you attached.
It’s a surprisingly clean interface for browsing your annotations, and it has a social angle. You can share individual highlights with your Goodreads friends or post them in reading groups.
To use it, link your Amazon and Goodreads accounts. If you created your Goodreads account before Amazon acquired it, you may need to connect them manually. Go to Goodreads Account Settings > Apps > Amazon and follow the prompts. Once they’re linked, your Kindle highlights will start flowing in automatically.
How to Delete or Edit Highlights and Notes
Changed your mind about a highlight? Wrote a note at 2 a.m. that no longer makes any sense? You can clean those up in seconds.
To delete a highlight, open the book on your Kindle and navigate to the highlighted passage. Long-press on the highlighted text, and a menu will pop up. Tap Delete, and it’s gone. Alternatively, open the Notebook, find the highlight in your list, tap it, then choose Delete. Either way, it takes about three seconds.
To edit a note, open the Notebook, scroll to the note you want to change, and tap it. The keyboard will slide up with your original text ready for editing. Make your changes, hit Save, and you’re done. If you’d rather just erase it entirely, tap Delete instead.
Why are my Kindle highlights not showing up?
This is one of the most common frustrations Kindle owners run into, and the answer is almost always one of two things:
1. Sync issue: Your Kindle hasn’t synced with Amazon’s servers in a while. Connect to Wi-Fi, then tap Sync. Give it a minute, and your missing highlights should reappear.
2. USB-sideloaded books: If you transferred a book to your Kindle via USB instead of downloading it through the Kindle Store, your highlights for that book live only on the device itself, in the “My Clippings.txt” file. They won’t sync to the cloud, they won’t show up at read.amazon.com, and if you delete the book from your Kindle, those highlights go with it. (If you’re having trouble keeping your sideloaded titles from vanishing, read our guide on why sideloaded books disappear on Kindle and how to prevent it). If you sideload a lot of books, back up your My Clippings.txt file regularly.
Highlight Colors and Customization
For years, every Kindle highlight looked the same, a flat gray underline on an e-ink screen. That changed with the Kindle Colorsoft, Amazon’s color e-reader, which launched supporting four highlight colors: blue, orange, yellow, and pink, and a February 2026 firmware update added a fifth, green.
Whether you see these colors depends on your model. On the Colorsoft, the color e-ink screen displays actual colors directly, so no grayscale workaround is needed. On the standard Paperwhite (12th gen) and older grayscale Kindles, the same color options exist in the highlighting menu, but the device’s 16-level grayscale screen can’t render true color, so highlights all appear as gray shading on the e-reader itself. Either way, the colors show up correctly when you view highlights in the Kindle app on your phone or tablet, or on Amazon’s web-based Notebook, so that’s where color-coding becomes most useful if you’re on a grayscale device.
To choose a color when highlighting, select your text the usual way, long-press and drag, and when the pop-up menu appears, you’ll see colored circles above the Highlight option. Tap the color you want, then confirm the highlight. To change a highlight’s color, tap on an existing highlight in your book; the pop-up menu will reappear, letting you pick a different color. The change syncs across your devices automatically.
The practical use case? Color-coding by category. Use yellow for key ideas, blue for facts or data, orange for quotes you want to share, and pink for things you disagree with or want to revisit. It’s a small feature, but if you’re the kind of reader who annotates heavily, it brings a layer of organization that plain gray highlighting can’t match.
Recommended Reading
Best Kindle Reading Tips: 22 Tricks Every User Should Know
Highlighting and notes are just one layer of getting more out of your Kindle. This roundup rounds out the picture with 22 additional tricks covering navigation, reading speed, and device settings, helping readers who just mastered annotations turn their e-reader into a more efficient, personalized reading tool overall.
Benefits of KOReader: 13 Reasons It Beats Default Apps
The article’s Pro Move section shows how Readwise and Clippings.io route annotations into apps like Notion and Obsidian, but KOReader offers a different path entirely. This piece explains why swapping the default reading app can give you deeper highlight control, better organization, and more flexible export formats from the start.